This blog post is meant to guide you through how to easily use and set up an HPC cluster. This is the first article in a 3-part series about multi-node machine learning. You can also check out:
- Intro to Multi-Node Machine Learning 2: Using Slurm — find out how to launch jobs on an HPC cluster with Slurm.
- Intro to Multi-Node Machine Learning 3: Multi-Node Training — find out how to launch a multi-node job to train ML models.
⚠️ Note: This article uses the AWS Parallel Cluster as an example of how to set up a cloud-based cluster.
1. Intro to HPC clusters
A High Performance Computing cluster is a collection of interconnected computers designed to handle computationally demanding tasks, and is thus often used for machine learning workloads.
1.1 Cloud-based clusters vs on-premise clusters
While traditional on premise HPC clusters have their own advantages, such as better network communication or more control over each component, they require significant investment in hardware and expertise to set up and maintain the infrastructure.
Cloud-based clusters, on the other hand, are easier to set up and require less maintenance. The main advantages are:
- Scalability: supports a mix of on-demand and spot instances, which means you can configure the cluster to automatically scale based on demand and specify the desired ratio of on-demand to Spot Instances.
- Integration: integrates with other cloud services such as shared storage (e.g. s3 and Amazon FSX Lustre on AWS)
- Customisation & Elasticity: you can easily configure different cluster components, such as instance types (e.g. compute or memory optimised instances), storage capacity and type, maximum number of compute nodes etc.
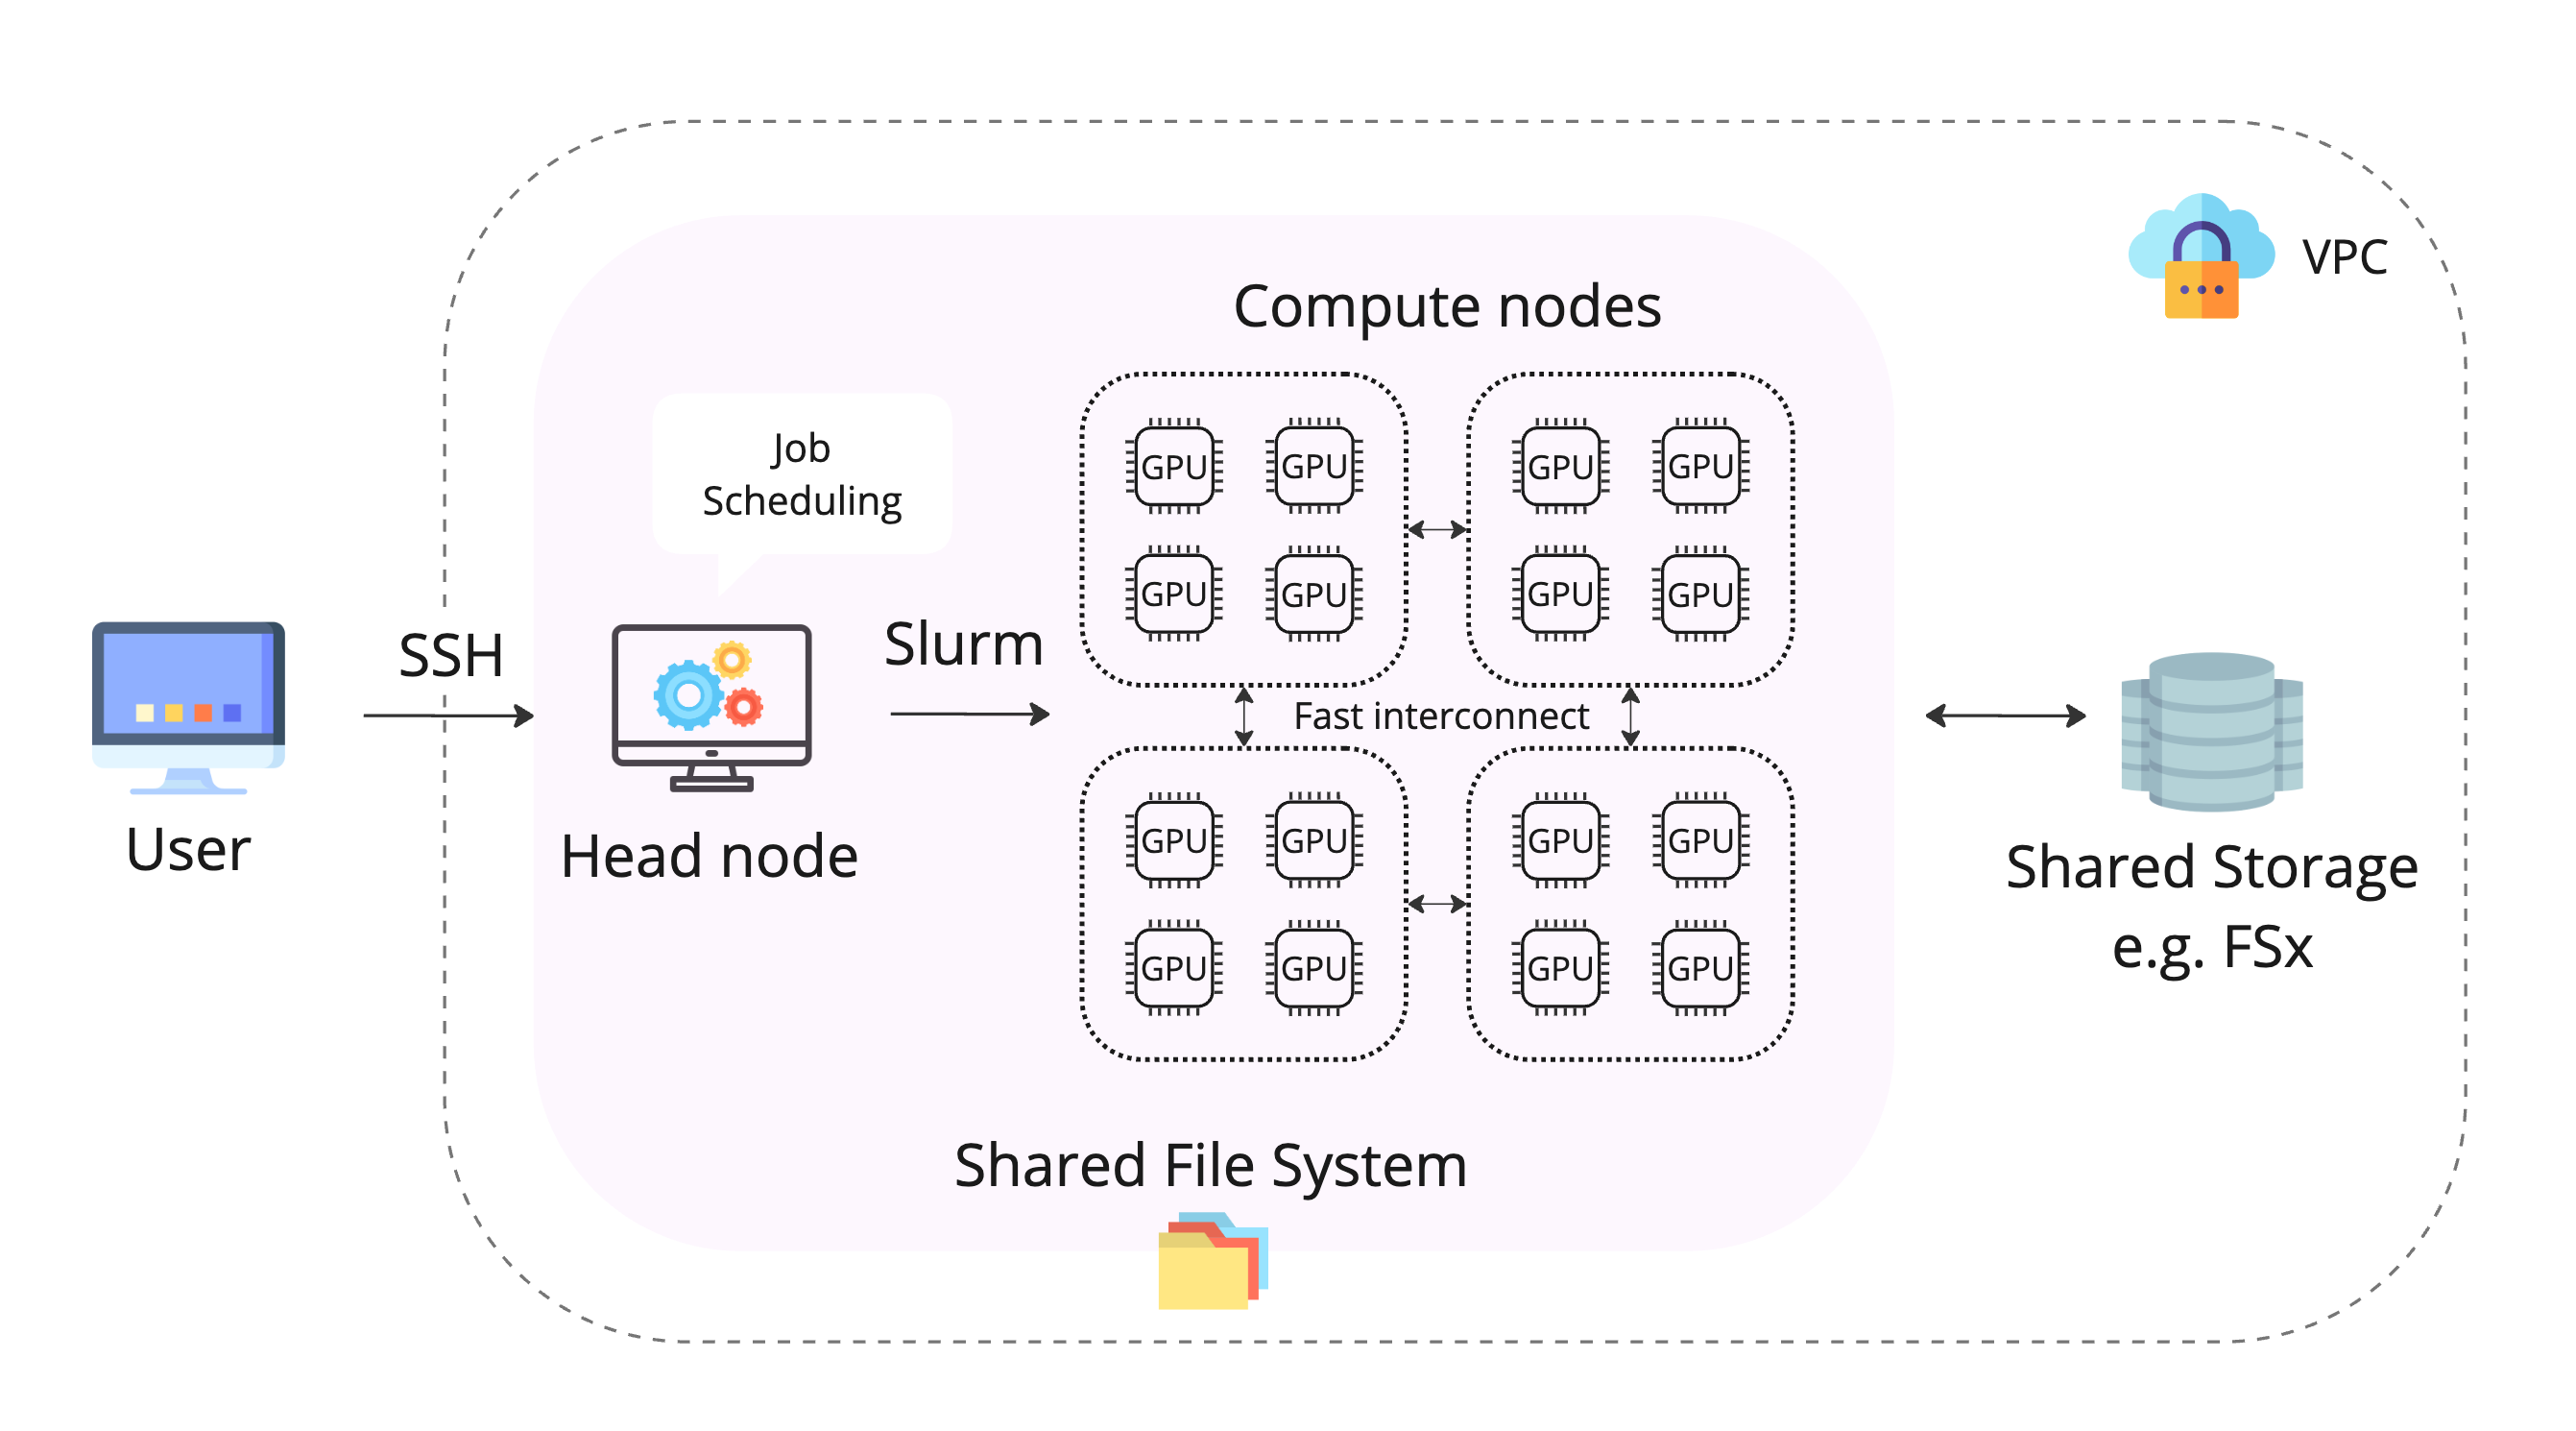
1.2 How does an HPC cluster work?
An HPC cluster usually has the following components:
- A head node: orchestrates the scaling logic of the cluster and is responsible of attaching new nodes to the scheduler.
- Compute fleet: collection of nodes that are scaled up or down when submitting a job. They share the same filesystem as the head node.
- Shared filesystem: centralized storage that can be accessed by all nodes in the cluster, often in the form of a high-speed parallel file system.
- Cluster management software: handles job scheduling, resource allocation, monitoring, and other administrative tasks. A popular cluster orchestrator tool is Slurm.
- Networking: nodes are connected via high-speed networks e.g. InfiniBand, Ethernet etc. to ensure fast inter-node communication.
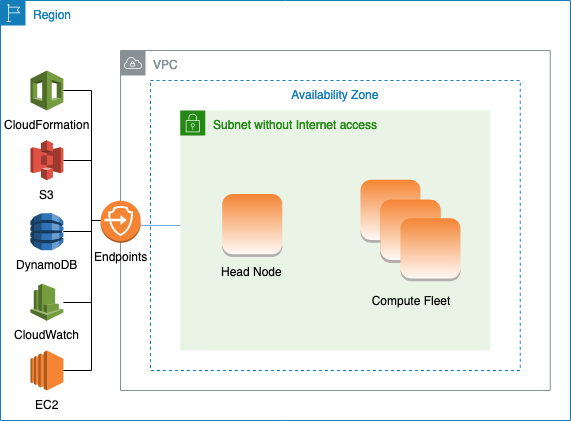
2. How to set up an AWS Parallel Cluster from scratch
You can create a new AWS parallel cluster at no additional cost, you only pay for resources needed to run it.
2.1 Creating the cluster from CLI
Prerequisites:
- AWS credentials
- AWS CLI
Install AWS ParallelCluster:
Install nvm if applicable. Node.js is needed by AWS Cloud Development Kit (AWS CDK) used to define cloud infrastructure as code through Cloud Formation. This enables a user to create a template that specifies the cluster configuration, which will be used to generate the cluster.
Verify that AWS ParallelCluster is installed correctly:
To create the cluster, you need to create a yaml config file with the desired specifications. You can choose different AWS EC2 instance types.
Below is an example of a config file with:
- a head node using the c5.9xlarge instance type (36 vCPUs) and 100GB of EBS storage
💡 Note: the head node is not designed for heavy computation, so it doesn’t need a beefy instance type, however, if it needs to scale up and down a large number of nodes it might benefit from extra CPUs. - using Slurm as a scheduler; AWS also supports AWS Batch for running batch jobs as containerized applications
- a CPU queue of 20 c5.9xlarge instances, with 36 vCPUs each
- a GPU queue of 10 g5.2xlarge instances, each with 1 A10 GPU and 8 vCPUs
- a GPU queue of 10 p5.48xlarge instances, each with 8 H100 GPUs and 192 vCPUs
- shared 10TB FSx Lustre storage, which is a shared filesystem used for maximized throughput to compute resources and fast access to S3
⚠️ Note: It is important to specify the SubnetID under Networking to make sure the cluster isn’t visible to everyone externally. The different subnets can be seen under the Virtual Private Cloud section on AWS.
⚠️ Note: Make sure to check the pricing of each instance type, as well as the pricing of additional shared storage such as FSx for Lustre before trying it out on the cluster. If you just want to play around with it, you might want to opt for a queue with some general-purpose instances first (such as t2 or t3) and leave out the additional shared storage.
⚠️ Note: When configuring options for the FSx Lustre storage, be careful when picking between scratch and persistent file systems. While scratch file systems are more cost-effective and can be a good option for temporary storage, your data will be wiped out if a file server fails. You can find more details about this here.
Create the cluster by specifying the config file and the cluster name:
You can check the status of the cluster with:
Once the cluster status is CREATE_COMPLETE you can ssh into the head node with:
You should now be able to see your ip address when you ssh into the head node in the terminal after your username:
To be able to use ssh parallel-cluster directly, add your cluster details locally to ~/.ssh/config:
Once you’re logged in on the head node, run sinfo to verify that the compute nodes are set up and configured:
You can also check GPUs are visible by running:
2.2 Installing users
The AWS recommended way is to use Simple Active Directory. However, for a quick & easy way of adding users — adapted from this blog post — you can follow the steps below.
First, ssh into the head node and create a bash script that takes in the new user name and their public ssh key, and then creates a userlistfile under /opt/parallelcluster/shared with the user name and UID:
Then, back on your local machine, create a create-users.sh script with the following:
Upload the script to the s3 bucket created by the parallel cluster:
Update your cluster config to configure the node using this file for each Slurm queue and add access to the above s3 bucket (you only need to do this once):
Update the cluster (make sure no jobs are running, as this will stop the compute fleet):
Once the cluster is updated and running, the new user should be able to access the cluster with:
⚠️ Note: Next time a user needs to be added you can just run the add_users.sh bash script from the first step (no need to update the cluster again).
2.3 Setting up Slurm accounting
Slurm accounting can be used to collect information for every job and job step executed.
This solution uses mariadb and is adapted from this.
Run sh script below with sudo to install mariadb and set up Slurm accounting:
Check out if accounting works by running sacct.
3. Developing on the cluster
3.1 How to use the cluster
A usual workflow could consist of:
- ssh-ing into the head node
- creating a virtual environment and your own working directory under the shared storage e.g. on /fsx/, on the head node /home/username/, or on an EFS storage
- submit a job to the compute nodes specifying the resources it needs with Slurm (see Part 2 on how to do this)
💡 Note: The head node and compute nodes share the same filesystem, so you will be able to access the same virtual environment/directories from the compute nodes as well.
3.2 Launching an interactive session
To ssh directly into one of the compute nodes you can launch an interactive session with Slurm that will open a bash terminal on that node:
You can now run a debugger from the launched bash shell. If you have a remote cluster and an IDE that supports remote development e.g. VS Code, you can add the new node host to your local config file e.g. in ~/.ssh/config. To find the name of the new node run squeue and look for your job and check which node it is using e.g. gpu-queue-dy-g52xlarge-1.
You should now be able to find the new host in your IDE remote explorer under ssh hosts and launch a new window from there.
💡 Note: Since the host key of the instance will change every time you launch an interactive session, you can add StrictHostKeyChecking=no and UserKnownHostsFile=/dev/null to the config to stop checking the host key or adding it to the known hosts file.
⚠️ Note: Once the time limit is reached, the node won’t be accessible anymore, so you’ll have to launch a new interactive bash session.
3.3 How to enable better inter-node communication
When you first try to use an HPC cluster to scale up your job you might feel quite excited to just sit back, relax, and watch as your code scales perfectly across 1,000 nodes.
What you often get instead is a sad, droopy curve that looks like it gave up on life halfway through.

One of the usual suspects to look out for when this happens is low network bandwidth. This means that the nodes are not exchanging information quick enough, resulting in a communication overhead that can become a bottleneck for your job. Cloud-based clusters in particular can suffer from this as the individual compute nodes are not usually located as closely together as the on-premise equivalent.
Nevertheless, there is hope. Here are some ways to increase the network bandwidth:
- make sure your compute nodes are located in the same geographical region e.g. on AWS you can select a Placement Group for your cluster to ensure the nodes are close together in the same Availability zone;
- choose instances that have a high network bandwidth (e.g. above 100GB/s);
- enable a high speed network interface, such as AWS’ Elastic Fabric Adapter (EFA).
⚠️ Note: Distributed ML packages like Pytorch’s torch.distributed use NVIDIA’s Collective Communications Library (NCCL) backend to implement multi-gpu and multi-node primitives (e.g. operations like all-gather or all-reduce). To make full use of EFA for ML tasks, you’ll need to make sure NCCL will work with it. At the time of writing, NCCL with EFA is supported only with p3dn.24xlarge, p4d.24xlarge, and p5.48xlarge instances.
If you have the instance type that supports EFA, you can enable it by adding it as an option to the cluster config and update the cluster:
Once the cluster is updated, you can check it works with NCCL by installing and running nccl-tests, which will test the performance and correctness of NCCL operations.
Here’s an example of testing the performance of the all-reduce operation by running all_reduce_perf:
💡 Note: Running module load X will load all relevant environment variables/packages. If module is not recognised, you might need to run source /etc/profile.d/modules.sh.
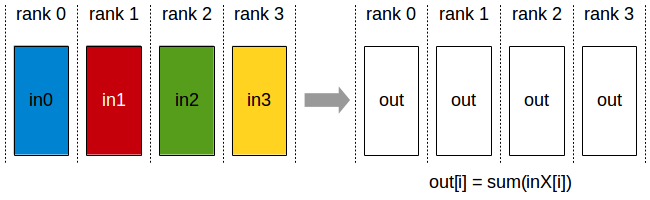
💡 Note: The all-reduce operation is a collective communication operation that is used to reduce data across multiple GPUs/nodes in distributed training. Some examples of reduce operations are: sum/min/max.

3.4 Running containers on the cluster
Containers are usually used to package applications and their dependencies together, so that the application will run the same way regardless of where it’s deployed. This make it easy to share and reproduce them across different stages of development, testing, and production.
Since containers need privileged runtime i.e. having root access, you might wonder if it’s possible to use containers on the cluster. Nvidia’s enroot tool gets around this limitation by using chroot(1) to create an isolated runtime environment for the container, limiting its access to a subset of the filesystem.
To actually run the containers, Nvidia’s pyxis plugin for Slurm allows you to run containers by only specifying the container uri i.e. amazonlinux/latest.
For a great tutorial on how to set up these tools on AWS Parallel Cluster, check out this blog post.
Summary
Hopefully by now, setting up a cluster and using it looks less intimidating. Check out Part 2 of this series about how to submit jobs with Slurm.
Further reading
- AWS Parallel Cluster best practices
- Elastic Fabric Adapter
- the Stability HPC user guide