At Unitary we are training state of the art multi-modal machine learning models to detect harmful content in line with platforms' detailed content policies, ensuring a safer online environment for everyone. This task requires not just innovative AI solutions but also robust computational infrastructure to handle large datasets and complex model training sessions.
This is where Slurm comes into play, an open-source workload manager designed to scale up machine learning and data science operations efficiently. This has allowed us to quickly experiment with and implement the latest AI technology to improve the accuracy of our models.
Since Slurm is infamous for having a bit of a steep learning curve - we've shaped our learnings into a detailed guide so that you can do efficient scaling of your own ML training workloads.
This article is the second in a 3-part series about multi-node machine learning. You can also check out:
- Intro to Multi-Node Machine Learning 1: Setting up an HPC cluster — find out how to easily set up AWS Parallel Cluster.
- Intro to Multi-Node Machine Learning 3: Multi-Node Training — find out how to launch a multi-node job to train ML models.
⚠️ Note: This blog posts assumes you already have access to a cluster that has SLURM installed.
1. Intro to Slurm
SLURM (which definitely stands for Salvation Lies Under Resource Management) is a job scheduler used to schedule, manage, and allocate computational resources on high-performance computing (HPC) clusters.

1.1 Why use Slurm?
It might seem as though Slurm reeled you into its web, rather than you walking into it willingly — by which I mean you found out everyone in your proximity who’s using a cluster is already using it and you have no choice but to start using it too.
But haven’t most of us in ML experienced the pain of having to manually juggle different tasks from data preprocessing to model training and evaluation, especially when they seem to drag on forever on a single machine, while also sharing resources with other teammates?
Enter Slurm to help with:
- Resource allocation & scalability: You can easily specify how many CPUs, GPUs, or how much memory you need for your task.
- Running parallel jobs: Running experiments in parallel e.g hyperparameter tuning.
- Job queuing: If the cluster is busy, Slurm will queue your job and run it when resources become available.
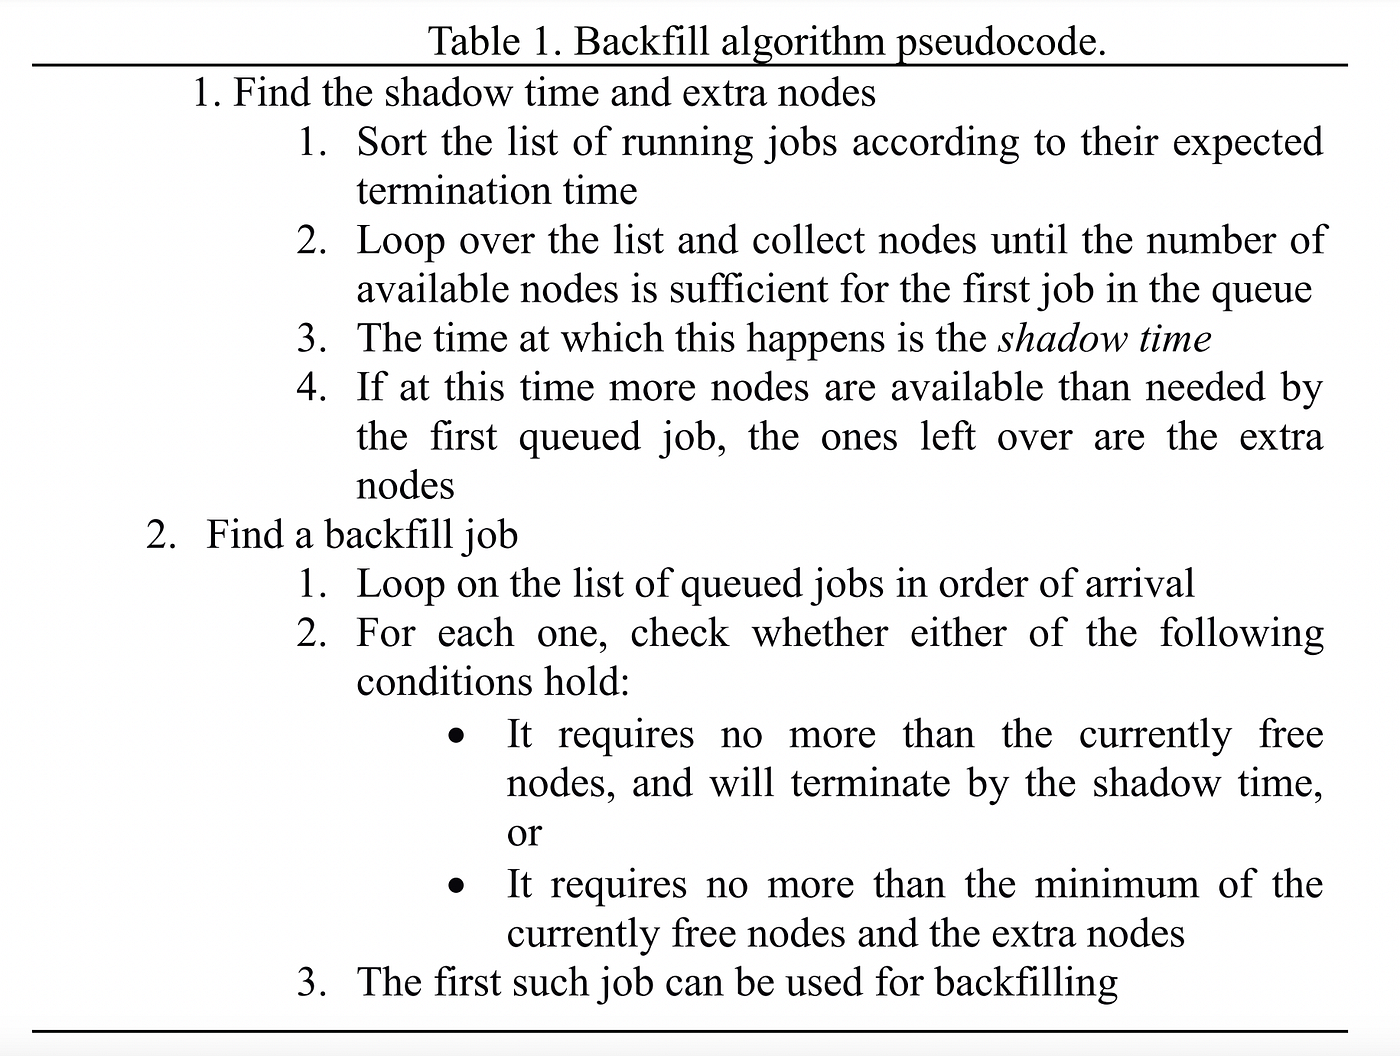
- Advanced scheduling: Supports backfilling, which allows smaller jobs to fill gaps in the schedule without delaying larger jobs.
- Monitoring jobs: Keep track of your job’s status, whether it’s running, pending, or completed.
- Fair usage: Uses the fairshare algorithm to ensure resources are distributed fairly among users.
- To impress at parties: Ever get stumped when people ask you what you do at your coding job all day? Not anymore, now you can shut them up with: “Hey there, I manage thousands of nodes with SLURM!” Boom. No follow-up questions needed.
1.2 Slurm vs Kubernetes

While both are powerful orchestration systems, they both have their strengths and weaknesses.
Given its HPC roots, Slurm was designed to manage and schedule large batch jobs on clusters or supercomputers. It excels at handling long-running, compute-intensive ML tasks, so it shouldn’t come as a surprise that it’s having a bit of a comeback for training foundation models like LLMs or large-scale simulations. It also provides a decent enough user management experience depending on whom you ask.
Kubernetes, on the other hand, was designed for orchestrating containerised applications and can be used when ML workflows involve multiple interconnected services, such as data preprocessing, training, and serving inferences in real-time. It is the better choice for dynamic, cloud-based infrastructures where services can be quickly scaled up or down based on demand. Hence, it is often used in model deployment and production.
💡 Note: If you want the best of both worlds and run containers with Slurm, you can also integrate Slurm with Kubernetes. You can read more about how to do this here. Alternatively, you can use Nvidia’s Enroot and Pyxis tools to run containerized tasks. Check out this great article about how to set up containers with Slurm on the AWS Parallel Cluster.
1.3 How does Slurm work under the hood?
These are the processes that run in the background powering Slurm:
Control Daemon (slurmctld): The central management daemon responsible for the overall operation of Slurm.
Compute Node Daemon (slurmd): There’s one for each compute node, manages local resources and jobs for that node.
Slurm DataBase Daemon (slurmdbd): Optional daemon responsible for logging accounting data about jobs, users, and resources in a relational database.

What happens when you submit a job?
Once a job is submitted along with the resource requirements, Slurm then calculates job priority, considering factors like expected running time, user-defined weights, the fairshare algorithm, job age, size, and the designated queue. As resources become available, jobs are allocated to nodes based on these prioritised requirements.
2. How to use Slurm
2.1 Important terminology
These are common terms that are essential to understand when using Slurm.
Jobs: A job is the script or application that will be run on the compute nodes. It is assigned one job id and can consist of one or multiple tasks.
Job steps: A job consists of one or more steps, each consisting of one or more tasks. Job steps are used to split a single job into multiple distinct phases or units of work. Each job step can have its own set of resource requirements and can run a different command or script.
Tasks: A task is a unit of work that runs concurrently across nodes. Usually, tasks are used to split a large job into smaller, parallel components to take advantage of the HPC environment. The number of tasks in a job is specified by the user, and each task is assigned a unique task ID within the job.
Processes: A process is an instance of a script that is executed on a compute node within a task. Each task may have one or multiple processes. Processes are managed by the operating system (not by Slurm) and can be thought of as the actual running instances of the script on the CPU cores. You can find out the node local task ID for the process within a job by checking the SLURM_LOCALID.
Partition: A grouping of nodes within a cluster, which is used to organise resources and manage access control. It is another name for a queue e.g. a gpu or cpu queue.
2.2 Key Slurm commands
If you just got access to a cluster using Slurm, these are the first commands you should run to get a sense of what’s already running, who’s using it, what type of compute nodes are available and how many there are in each partition.
sinfois used to get information about which nodes and partitions (collection of nodes) are available as well as other configurations settings such as maximum number of nodes and time limit.
squeueis used to list the jobs that are currently in the Slurm queue and see their status e.g. pending/running/configuring.
srunis used to submit a job that will run whatever command is specified aftersrune.g.srun --nodes 1 python my_script.pyorsrun --partition gpu-queue nvidia-smiscancelto cancel a job e.g.srun $JOB_ID. You can find out the job id by runningsqueue.
2.3 Writing Slurm job scripts with sbatch
sbatch is used to submit a batch script consisting of multiple sbatch flags that specify the resource requirements and at least one srun command.
💡 Note: When it is used within an sbatch script, srun will create a job step within the same resource allocation specified by the sbatch flags. However, if srun is used from the command line directly without having allocated resources, it will launch a new job and will allocate the resources needed for that job.
So what is the difference between srun and sbatch?
Although you can specify almost the exact same resource allocation flags to both with a few exceptions (e.g. --exclusive), there are a few important differences.
While srun is meant to be used interactively since it prints its output directly to the terminal, sbatch is usually used to submit more complex workflows (e.g. having multiple job steps or using job arrays) and will write its output to a file. Moreover, if a job fails with sbatch it can be requeued automatically with the --requeue sbatch directive.
Using sbatch for CPU-intensive tasks
Common tasks that require considerable CPU processing power include resizing images/videos, feature extraction, data cleaning, writing to a database or datastore etc.
Example sbatch script using CPU instances only:
Using sbatch for GPU-intensive tasks
This includes training ML models, evaluating models, getting embeddings, transcribing videos etc.
Example of a sbatch script using GPUs:
Once a job is launched with sbatch file_name.sh you can monitor the state of the job and check whether it’s using the resources you’re expecting with squeue. If something doesn’t look right, don’t panic, you can quickly cancel the job with scancel $JOB_ID.
2.4 Setting resource requirements (CPU, GPU, Memory, etc.)
Common SBATCH directives for various resource requirements:
⚠️ Note: The --gpus flag is to set the number of GPUs per job, whereas --gres is to set general resources per node and is equivalent to --gpus-per-node. Generally it is recommended to use --gpus-per-node in most cases combined with --ntasks-per-gpu as all tasks in your job will be guaranteed to have access to a GPU.
⚠️ Note: If you don’t officially request a GPU with Slurm, it won’t know not to allocate it to other users’s jobs.
💡 Note: It’s good practice to only request what you need so other users can benefit from the shared resources too.
💡 Note: Each node consists of a hierarchy of building blocks: it can have one or more CPU sockets, each socket can contain one or more CPU cores, and each core can have one or more logical threads. Slurm uses the term CPU to refer to a logical CPU core so when you request --cpus-per-node you are requesting the number of CPU cores per node.

2.5 How to debug scripts directly on a compute node
If you want to debug directly on one of the compute nodes (e.g. you need a GPU to run the script), you can create an interactive session with a time limit that will launch a bash shell:
You can now run a debugger from the launched bash shell. To find out about how you can use VS Code from the compute node head out to Part 1 of this series.
3. Advanced Slurm Features
3.1 How to use job arrays for parallel tasks 👯
Job arrays make it easy to run many similar or identical jobs with the same resource requirements in parallel. Instead of writing separate job scripts for each individual task or using a loop to submit many similar jobs, you can use a single job array which creates multiple jobs based on an array index.
When should you use them?
A common use case for job arrays is in a data intensive application, where you want to distribute the data across different nodes and run the same task in parallel on each data chunk. For example, if you split your data across 10 files, each named data_chunk_{0..9}.txt , you can use the Slurm environment variable $SLURM_ARRAY_TASK_ID, which specifies the current array index, to differentiate between data inputs:
What if you don’t have enough resources to run all the jobs at once?
To limit the number of jobs running concurrently, you can use the % operator e.g. — array=0–9%5 to specify the job concurrency limit, meaning that only 5 jobs can be running at any given time. Once the first 5 are completed the next 5 will run automatically.
For example, in the output below, we have 1000 jobs launched with only 10 jobs running concurrently, while the others are pending. All jobs have a common job array ID, 345, and one unique job ID 345_0, 345_1, …, 345_9 that includes the array index.
💡 Note: By default, the maximum number of indices you can have in a job array is 1001. To increase the job array limit you will have to modify the MaxArraySize parameter in the Slurm config file, usually in /opt/slurm/etc/slurm.conf.
What if you want to launch non-identical jobs from just one job script?
You can do this using job steps. By default, all jobs consist of at least one job step. If you include multiple srun calls within an sbatch script, be it either sequentially or in parallel, Slurm will treat these as individual job steps with their own requirements.
This means that, instead of allocating the maximum needed resource for the entire job, you can specifically allocate only the needed resources for each part of the job.
💡 Note: In the above example, each step is dependent on the previous step completing successfully. If any step fails, subsequent steps will not be executed.
💡 Note: To make the job steps run concurrently, simply add & after each srun command and a wait at the end:
Benefits of using job steps:
- By treating separate parts of a job distinctly, job steps can help with debugging by making it clearer which part of a complex job has issues.
- If a particular step fails, you can rerun just that step again rather than start the entire job again.
- You can maximize resource efficiency by specifying only the needed resources for each job step.
3.2 Launch jobs directly from python using submitit library
If bash is not your thing, the submitit library can be a handy tool for launching Slurm jobs from python directly without the need to write sbatch scripts.
Here’s an example of a script to transcribe audio files with Whisper using job arrays and submitit. This will find the audio paths from a directory, divide them into 10 chunks and launch 10 jobs to process each chunk.
3.3 Using job dependencies for pipeline stages (e.g., data preprocessing → training → evaluation)
You can use the--dependency flag to set job dependencies. This ensures that a job only runs after the specified conditions are met.
For example, in a usual ML pipeline we have these stages:
- Preprocessing:
sbatch preprocessing_job.shwhich gets assigned the1234job ID. - Model training:
sbatch --dependency=afterok:1234 training_job.sh - Model evaluation:
sbatch --dependency=afterok:1235 evaluation_job.sh
4. Monitoring and logging job outputs

Slurm commands such as sinfo, squeue etc. communicate with the slurmctld and slurmd daemons to retrieve or modify information about nodes, jobs, and partitions.
Beyond using squeue to check the status of a job, here are a few other non-basic ways to get more information about your jobs.
Check the output/error logs in the files you specified in your sbatch script:
For more detailed info about the state of a job:
You can also ssh directly into the compute node (you can get the hostname from the squeue output) and run top/htop to see the running processes.
5. Handling job failures and restarts
Step 0: If it fails, blame Slurm.
Step 1: Check the job output/error files. If you haven’t specified one, the default is slurm-<job_id>.out.
Step 2: Check the slurm log files, likely under /var/log/:
slurmdbd.log: logs from the slurmd daemon (one per compute node).slurmctld.log: logs from the slurmctld daemon.
Step 3: Use sacct to check the state and exit code of a failed job:
Step 4: Try to debug directly on the node the job failed by either ssh-ing into it or launching an interactive session (See Section 2.4).
Step 5: Add print statements everywhere, resubmit, and pray for the best.
Step 6: Go back to step 0.
Summary
Slurm is a useful tool to submit and monitor large scale jobs. To find out more about how to use Slurm for training an ML model across multiple nodes check out the next part in this series!
Further reading